Showing posts with label Pinterest. Show all posts

Wednesday, June 3, 2015

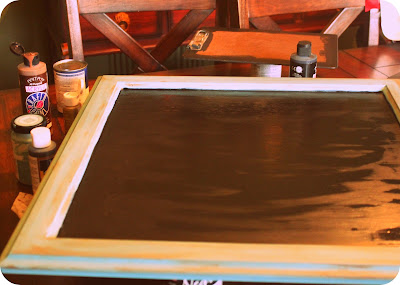
Scripture Chalkboard


For a long time I have had an odd,
 open space near our back door.
I knew I wanted something
personal and purposeful to fill it...
Then my sister posted on FaceBook that she
 had received some old cabinet doors...
She used two to make chalkboards
and I just knew one would be perfect in this space.
This chalk paint came from Walmart...
yup, Walmart!
And this very affordable chalkboard paint
 came from Hobby Lobby.
It took several coats...
which around this house
 meant several days to finish!
Did you know if you press
 wet paint brushes in a baggie,
they will keep for days without
drying out?
Yup, it works!
This adorable arrow sign
was also a great find at Hobby Lobby.
I do wish it pointed to our backyard,
as that truly is our "happy place"
but pointing to the kitchen works too, right?
We are using our chalk board to write out scriptures.
I just love it!
The kids are really into watching the scripture change!
Here is a list of scriptures we will
be working on this summer... 
http://ministry-to-children.com/bible-memory-verses/
So one project on my
"To- Finish" list is done!
On to the next...


Thursday, March 12, 2015

Navy Master Bedroom

Pin It
 
 We recently got a little frisky risky in our master bedroom...
with our paint color of course.
 Now, although I have a good eye for pretty rooms,
I am no professional AND
we do not have the time or
funds to UN-DO any decorating whims!
This is where my love affair with Pinterest comes in!
 
Here are a few tips on how I use Pinterest
 for our home projects.
First, start a board... be specific.
By this I mean, do not start a "bedrooms" board
with pins for every one's bedrooms.
Instead, assign a board for each room.
2nd, be specific in what you pin.
Now I love sleigh or iron beds and
there are some beautiful shabby chic bedrooms
 that are lovely and catch my eye...
But I know we will not be getting a new bed and
the shabby chic room will not be the direction I go.
I can add these types of pins to a
 "pretty spaces" or "dream house" board.
If I fill up my board with ALL
the master bedrooms that catch my eye,
 I will never find direction and
will become way too overwhelmed!
Another tip, is to be specific on those specific pins.
Search those specific elements you have in your plan.
For us, we had a blank bay window.
I was not sure what I wanted as far as window treatments
 or even how to use this space.
So after searching "master bedroom bay window"...
 I saw a fantastic reading nook.
(we are waiting for a chair to finish this out)
And after a "window treatments for a bay window" search...
I realized that a curtain rod for bay windows
 exists and it is cheapest at Lowe's!
One thing I find that really, really helps me
use my boards to plan projects is to study my pins.
I sit back and stare at all my pins on the board.
What do they all have in common?
Aside from color, all the beds had lots of layers and textures,
a bold navy wall, and a classic feel.
At this point I made my wish list and
 started the hunt for bedding, curtains, paint, and accessories.
(I am still looking for a few more linen or burlap pillows)
My last tip, is trust your board.
When I brought home the paint samples
both my husband and my MIL had big doubts.
To be honest, pre-Pinterest I don't think I would have had the guts
 to paint anything this dark or take scissors to a curtain panel!
But that is what makes Pinterest so much fun,
all the creativity with none of the mistakes!
If you are picky about your pins,
then you will truly love your boards.
We are not completely finished with this room,
but now I am so inspired by the room
I don't even need my board to add the details in!
It is absolutely addicting to watching my boards come alive!
 
So tell me what board you have been pinning to?
Any big projects in your future?


Wednesday, March 6, 2013

New Recipe With Extra Veggies

We have been trying lots of new recipes,
since we started our wheat free lifestyle.
We have also tried to double our vegetable intake
and even gone back to meatless Mondays.
This dish- hits all three!
I was inspired by this one HERE
on my pinterest board from Perry's Plate.
(super yummy blog!)

So here is my take on the...
 Veggie Enchilada Casserole

1 poblano chile, chopped
1 red bell pepper, chopped
1/2 head of cauliflower, chopped
1 medium onion, sliced

1/2 bag frozen corn
3 T olive oil

1 1/2 tsp cumin
2 garlic cloves, minced
salt and black pepper
2 cups pico de gallo
2 ounces baby spinach

9-10 corn tortillas, halved
2 cups shredded Monterey Jack cheese
green onions for garnish


Directions:
Preheat the oven to 425'. Lightly oil a large cookie sheet.
Place poblanos, bell peppers, cauliflower, onion, and corn kernels (any other veggies you like) onto cookie sheet. Drizzle on the olive oil and coat with cumin, garlic, salt and pepper. Toss them well,so that it is nice and covered. Lay the vegetables evenly in the pan. Roast for 30 minutes. You can turn or mix the veggies half way through. (PS. we love our veggies just like this, but keep going...)

Reduce the oven to 350' degrees.
Spray your casserole dish with pam or coat in olive oil. Spread 1/4 cup of pico into the bottom of the baking pan. Now start layering... tortillas, veggies, spinach, cheese! Top with with a layer of tortillas, extra cheese, and the green onions. Bake for 20 minutes or until it is heated all the way.We had ours topped with avacado and sour cream!

 
Pin It

Monday, December 17, 2012

Merry Pinterest: Day 5

 
The Christmas pin I brought to life for day five,
 was a sensory table for Addy.
We used her water table that we keep on the back porch...
one plus to a Texas winter!

 This pin came from Mary Lea who is
The Pink and Green Mama
 and blogs HERE.
Ther are lots of good things at her place!
 
We threw in jingle bells, Christmas buttons, and Grinch foam pieces.
I got the bags of peas for just 88 cents!
She had a blast, until the big kids came home from school...
and used all her peas, to "cook"
She was pretty sad it was mixed with dirt and leaves,
but it was fun while it lasted!

If you want to see more fun Christmas ideas...
look HERE!
Pin It

Saturday, December 15, 2012

Merry Pinterest: Day 4

 
Around here we like to have mini date nights
when the kids head to bed...
On one such night we made these yummy Candy Cane Cocktails
(they have 12 holiday cocktails!)

:
Candy Cane Cocktail
 
Ingredients:
2 1-2 oz vodka
1 oz White crème de menthe
1/2 oz Peppermint schnapps
Cream
Splash of Grenadine
Peppermint candy for garnish

Add a dash of grenadine into the bottom of a chilled martini glass and set aside. Pour the rest of the ingredients into a cocktail shaker filled with ice. Shake well and strain into the glass with grenadine to create a “swirl” effect. Garnish with a candy cane and sprinkles!!


We have also made a few more cocktails...
Hot Buttered Rum
Apple Cider with Spiced Rum
and
White Russians

 
Check out the yummy Christmas Cookie Cocktails
 I pinned on my Christmas board, too!
Pin It

Friday, December 14, 2012

Merry Pinterest: Day 3

 
This project is all over pinterest... have you seen it?
I used a big metal tray I had and filled it will
everything you can think of that would
 bring your hot chocolate up to the next level!

 On this night we had... several different kinda of cocoa mixes.
Our two favorites are the authentic Mexican mix
 and star bucks salted Carmel-yum! 
We had chocolate chips, Carmel dots,
 and two kinds of candy canes. 
 Those little snowmen are marshmallows! 
I also found peppermint and gingerbread marshmallows!
Adelyn has been really into this and
pretty much will add anything to her hot chocolate.
Including gingerbread men,
 jumbo marshmallow after jumbo marshmallow,
 and her very favorite whipped cream!

We found these darling mugs several years ago at goodwill,
but a few friends have splurged on the mugs from pottery barn!

 
Mike also, likes our hot cocoa bar nights...
make great motivation for knocking out his homework!
 
CHEERS!
and don't forget to stop by my
Christmas Pinterest board HERE!
Pin It

Thursday, December 13, 2012

Merry Pinterest: Day 2

 My next Pinterest project came from both Tami at Curb Alert...
who has a much prettier porch than me and is pretty funny!
and another pin, from the smart gal at A Diamond in the Stuff...


So I already had this darling from my friend Stacey gave me...
It was pink for the Princess Leia Party,
but I just knew it wanted to be red!

 
I did not read the how to's from the girls blogs
and just went from the picture...
and I learned from that two things...
#1 read the blog first to save time
 and #2 don't use wire for the balls!

Please check out my Christmas Board HERE!
Trust me its a good one!

Wednesday, December 12, 2012

Merry Pinterest: Day 1

SO, ya I know I have not been able to blog much...
yes, I know even my Halloween pics
and Disney World posts are not up, but....
We are really, really excited about Christmas around here...
However, between our big trip to Disney World and
my etsy store busting at the seams I found myself feeling
very overwhelmed with everything I wanted to do, make, eat, and see.
Then after a long soak in the tub and a glass of wine,
I settled on a plan...
I would pick 12 pins off of my Pinterest board (HERE)
 and just make those Christmas pins happen...
ahhh... it has been perfect...
and yummy!
 
One pin the whole family wanted to try was this Gingerbread Cheese Cake!!
This recipe of an original from the great Martha Stewart,
but my pin came from
which happens to be one of my newest favorite blogs!!

Ingredients

  • All-purpose flour, for dusting
  • 1/4 recipe of the dough for Molasses-Gingerbread Cookies
  • 4 tablespoons unsalted butter, melted
  • 1 3/4 cups granulated sugar
  • 2 pounds cream cheese, room temperature
  • 1 teaspoon pure vanilla extract
  • 4 large eggs, room temperature
  • 1/4 cup molasses
  • 1/4 teaspoon salt
  • 1 1/2 teaspoons ground ginger
  • 1 teaspoon ground cinnamon
  • 1 teaspoon freshly grated nutmeg (my fisrt time with this!)
  • 1/4 teaspoon ground cloves
  • 1/2 teaspoon finely grated lemon zest
  • 6 gingerbread men (see link above)

Directions

  1. Preheat oven to 350 degrees. Wrap exterior of a 9-inch spring form pan in 2 layers of foil.
  2. Roll dough to a 13-by-10-inch rectangle, about 1/4 inch thick. Slide dough onto a baking sheet. Bake until firm and golden brown, about 14 minutes. Let cool completely on sheet on a wire rack. Break into large pieces, then pulse in a food processor until finely ground.
  3. Combine butter, 1/4 cup sugar, and 2 cups cookie crumbs in a bowl. Press mixture firmly and evenly into bottom and one-third of the way up sides of prepared pan. Bake until set, about 10 minutes. Let cool on rack.
  4. Reduce oven temperature to 325 degrees. Beat cream cheese with a mixer on medium speed until fluffy, about 3 minutes. Beat in remaining 1 1/2 cups sugar and the vanilla, scraping down sides of bowl as needed. Reduce speed to low. Add eggs, 1 at a time, beating well after each addition and scraping sides of bowl as needed. Beat in molasses, salt, spices, and lemon zest. Pour filling into cooled crust.
  5. Place cheesecake in a large, shallow roasting pan.(we had to use a jelly roll pan, because our roasting pan was not large enough for the spring form pan-but it works just fine!) Move to oven, and carefully add enough hot water to roasting pan to come about halfway up sides of spring form pan. Bake until cheesecake is set but still slightly wobbly in center, 60 to 65 minutes. Carefully remove spring form pan from roasting pan, and let cool on a wire rack. Refrigerate, uncovered, for at least 8 hours (we did this overnight).
  6. Before serving, run a hot knife around edges of cheesecake to loosen, and remove sides of pan. Arrange gingerbread cookies in center of cake in a circle (this kids did this)

This was kinda a long baking event... we did it over three days.
Day one we made gingerbread cookies for our gingerbread night
and just set aside the extra dough.  So I did double the cookie recipe.
Day two we made the cake and put it in the fridge...
it was SO hard not to eat it right away! but we had the cookies
from the night before to snack on!
Finally, on day 3 (4&5) we ate this fantastic cheesecake.
We plan on making it again for our family on Christmas Eve!


Pin It

Thursday, November 1, 2012

Make Mine Salty AND Sweet Please

 
I have made three batches in one week of these heavenly cookies...
ya see, I have the worst ever salty AND sweet tooth.
Every time I eat something sweet, I must have something salty.
Unfortunately it works the other way around, too!
 
When I saw this salty sweet cookie on Pinterest...
I HAD to try it.  The best part is the sprinkle of salt on top.
Don't be scared to put a whole pinch on... yum!

 
I traced the pin back to The Diary Of Dave's Wife blog...
such a cute blog... you should read it while the cookies bake!
She calls them..
The. Best. Cookie. Ever.
and I would concur!
HERE is the recipe!

Another pinterest find is this salty sweet mix.
Next time I will had dry roasted peanuts.
you can find this recipe HERE from Chex.com
Pin It

Wednesday, April 18, 2012

Pinterest = Love

With all my Etsy shop orders to be filled...
 a mom has to keep her kiddos busy!
Thank you PINTEREST for making this so fun and easy!

I saw this great pin HERE... I cant trace to a site or bog.
And we brought it life the other day... what a "hit"...
I would even say a "home run,
as the kids played and played with our version!
 After raiding our recycle bin,
Mike and I layed out the roads with blue painters tape.
 We used a small box for the garage....
 and a couple of more for a bridge...
 and a tunnel!
 Adelyn wanted to add Lala and Pops' house...
which was far away onto the couch
and Mike wanted a grocery store.
Mike even had the great idea of adding
 a part of his matchbox track...
The City! 

What an easy, fun, and green idea!
Thanks, Pinterest!
Pin It

Wednesday, March 28, 2012

My Lovely Little Laundry Room

If you read my blog, then you know my struggles with laundry...
I hate it!!  I can't keep up and it NEVER gives up!
After months of pinning lovely little laundry rooms,
I convinced my husband that with my very own
lovely little laundry room all my
laundry prayers would be answered!
PLUS, it will help us take another step in feeling 'settled"- right?
He happens to be tired of having
 to wear snowmen boxers...so we got to work!
 It started with my $1.99 chandelier from Goodwill
and a coat of red spray paint!
And it worked!!

 Next up, was this adding a counter top for
collecting folding laundry.

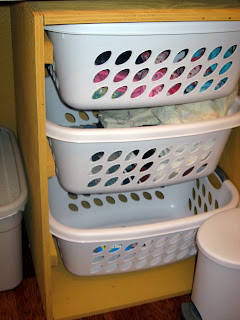
Then, this basket dresser that I had to have...
thanks again to pinterest! 
Ana White has the instructions HERE.
I love this thing... We have plans
to make one for Mike's closet!
 And another pinterest inspired project!!
I combined the cheveron trend with some wordy art!

 I used blue painters tape for the pattern
 and modge podged on the letters!
 I pulled a few pretty things out of old boxes...
since by this point my budget was down to nada!


 One of my favorite changes, is the addition
 of this shelf just above the washer and dryer.
We put cinder blocks behind them to prevent
them from rocking or moving backward...
thus allowing me to open my washer.
 I made the pokadot curtain to cover... umm... crap!
I need one more panel to make it perfect,
but they have been sold out of this fabric for months!
 I fell in love with this quote...
and you MUST check out Kelsey's site HERE!
She has so many wonderful and FREE printables!!

 So, I know you are wondering if this make over worked...
did making it lovely really help all my laundry woes?
Hmmm... let's keep it real girls...
Pin It

Let's go make something,

Kristy

Our Favorite Things